Friday, September 26, 2014

Fall Entryway

I love decoration for each season and one easy place to do so is in the entryway.
I'm here today to share a few pictures of out Fall entryway.


I clipped some low tree branches from a tree in our yard, stripped the leaves to make our cute little fall tree! The lunch box holds tons of die cut leaves, glue dots and a marker so we can write down what we are thankful for each day!


 Brownie Points!
 This picture frame is from April 2014 My Paper Pumpkin, a monthly club by Stampin' Up. 
I have so far changed out the original project (think Spring!) to Summer and now Fall. 
Can't wait to see what I come up with for Christmas/Winter. It's sat in the same spot since April and I can't get enough of it!

 The feather banner is from the Feather die set by Stampin' Up. I "dipped" the tips in gold glitter.
 Happy Stamping and Happy Cozying up the house for Fall!

I lOVE sharing what I make with you! If you would like to use any of my pictures on your own blog, please directly link back to me and give Christina Thurlow credit!
Thanks!!!


Tuesday, September 23, 2014

Scattered Thanks and CCC14

Fall is officially here and I find myself drawn to earthy colors this time of the year!l
Today's card for the Creative Challenge Club # 14 is a color challenge and pretty open ended if you ask me!

Pick from a list of colors, use any combo you want or all!
I managed to slip ALL of the colors in my card!


I started off with a base of Kraft Card stock cut at 8.5" by 5.5" and scored at 4.25".
I layered Cajan Craze (bottom layer) with Old Olive on top and then Whisper White as my very top layer. I stamped the "thanks" thank from Seasonally Scattered by Stampin' Up! (LOVE IT!) twice. The first stamp is on the base layer of Whisper White and then on scrap paper I stamped it again and cropped around just the "thanks". Flagged each end in Old Olive and popped it all up on Stampin' Dimensionals.  I added an Antique Brad accent to the bottom left. Behind all of that I wrapped Old Olive Bakers Twine 3 times before popping it all up on Stampin' Dimensionals.

And now for the inside of my card!


I stamped one of the feathers from Four Feathers in Early Expresso and then embossed the greeting in Crushed Curry. (I know, I know! Hello Honey is the yellow in the challenge but I decided to break the rules since it doesn't come in embossing powder and my card just. really. needed. it.) (smile)

I even fit the pool party into the design of the card!
Where you ask?
On the back! But yes, I forgot to take a picture.
So Sorry!
The back of the card says "made with love" from Kind and Cozy set. Perfect for a back of a card!

Here's this weeks banner:


And one last close up of my card:


Don't forget to link up and play along. If they have 15 link-ups they draw a name for $10 in Stampin' Up! product.  And the most awesome part? My card last week won me the $10! So link up and play along!!!

The card that won me $$.

Happy Stamping!

I lOVE sharing what I make with you! If you would like to use any of my pictures on your own blog, please directly link back to me and give Christina Thurlow credit!
Thanks!!!


Friday, September 19, 2014

Gift Box Punch Board

Hello!
I cannot tell you how much I LOVE my new Gift Box Punch Board!
I created this fun box for a set of crouched dish clothes for a friend!
The angle of the picture makes the dish cloths look HUGE compared to the box but I promise the fit!

I stamped, embossed and die cut some various flowers (all Stampin' Up!) to layer on top of a belly band made from Stampin' Up!'s burlap ribbon, crochet trim and lots of bakers twine twirled on top of the box.

 This sweet little tag completes the gift!
I think she will love it!

Happy Friday and Happy Stamping!

I lOVE sharing what I make with you! If you would like to use any of my pictures on your own blog, please directly link back to me and give Christina Thurlow credit!
Thanks!!!

Wednesday, September 17, 2014

Four Feathers Thanksgiving Card and CCC13

Hi Guys!
I have another Thanksgiving Card to share today!
It's only September and I almost have all of the Thanksgiving Cards needed to send to Grandparents and long-distant friends!
This week's Creative Challenge Club sketch was very simple- love it!
What do you think?
Basically a card base, three objects with a strip behind it!
After giving it some thought for a few days I decided I wanted to use the Four Feathers Stamp set and framelits and do something for Thanksgiving!
My card is actually partly CASED from the Stampin' Up! Holiday Catalog. 
Of course I put my own spin on it to make it mine and just love how it turned out.

I just love pops of aqua mixed in with Fall colors so I "dipped" the third white feather in Tempting Turquoise embossing powder from the clearance rack. 
The Cajan Craze banner is cropped with the banner framelits. Thinking about it now I should have taken a picture of how I made it extra long!
Sorry!
Basically measure and cut where you framelit will cut the paper (from "blade" to "blade"). Slip the strip of paper in under the framelit but leave the long end ON TOP of the top flat part of the framelit (opposite of the flagged end). Build your sandwich but don't put your TOP plate over the top flat edge of your framelit. 
I'm sure that is very confusing! Sorry again!
Just try it and it will all make sense, promise. :)
I randomly stamped feathers on to the Whisper White card base, layered a small piece of Whisper White centered on the card base before adding the Cajan Craze banner. 
The feathers aren't exactly centered on the small piece of Whisper White but that tiny paper clip balances it perfectly!
And you guessed it, a little greeting on the inside, stamped on the center right of the card.
I love placing the greeting there because I feel like it is a little more creative and modern!

Happy Stamping!


 I lOVE sharing what I make with you! If you would like to use any of my pictures on your own blog, please directly link back to me and give Christina Thurlow credit!
Thanks!!!

Friday, September 12, 2014

Finishing Touches

Earlier this week I shared some simple Thank You note cards I made for our son to fill out for his birthday gifts and today I whipped up a sweet little belly band and cut some confetti for each of the note cards!
To refresh your memory here are the thank you note cards:
Very very very simple and plain....a little boring!

But not anymore!

The flat fold card is 3.5" X 5" and I cut the belly band in Pacific Point at 2.5" X 8.5". I die cut a star in the center of each one (just eyed it, no fancy measuring here!) and then scored 2.5" in from both ends to perfectly wrap it around the card. I secured the overlap with some designer washi tape from Stampin' Up!'s clearance rack.
Just adding the belly band added so much to the simple cards!
But then....I had the idea to cut some confetti with my fringe scissors (love them!) and it took the simple card from, ummm simple, to WOW! I stuck the card with belly band and confetti in a cello baggie and stuck the whole thing into Stampin' Up!'s clear envelope. The cello baggie keeps the confetti off the shipping info (which will be written on the green (retired Stampin' Up! color) card stock) so Mr. Postman doesn't have a hard time seeing where to deliver it. 
Side note about the clear envelopes:
The post office can charge you more for them if they want. I have never been charge more even when taking them into the post office myself instead of dropping them off in the mail box. But just know, they can. I'm sure it depends on your post office. :)
(also don't forget to put your postage stamp on the outside of the clear envelope, NOT on the card stock. They need to be able to cancel the postage stamp :) haha

Happy Friday and Happy Stamping!


 I lOVE sharing what I make with you! If you would like to use any of my pictures on your own blog, please directly link back to me and give Christina Thurlow credit!
Thanks!!!

Tuesday, September 9, 2014

Happy Thanksgiving CCC12

It's time for another 
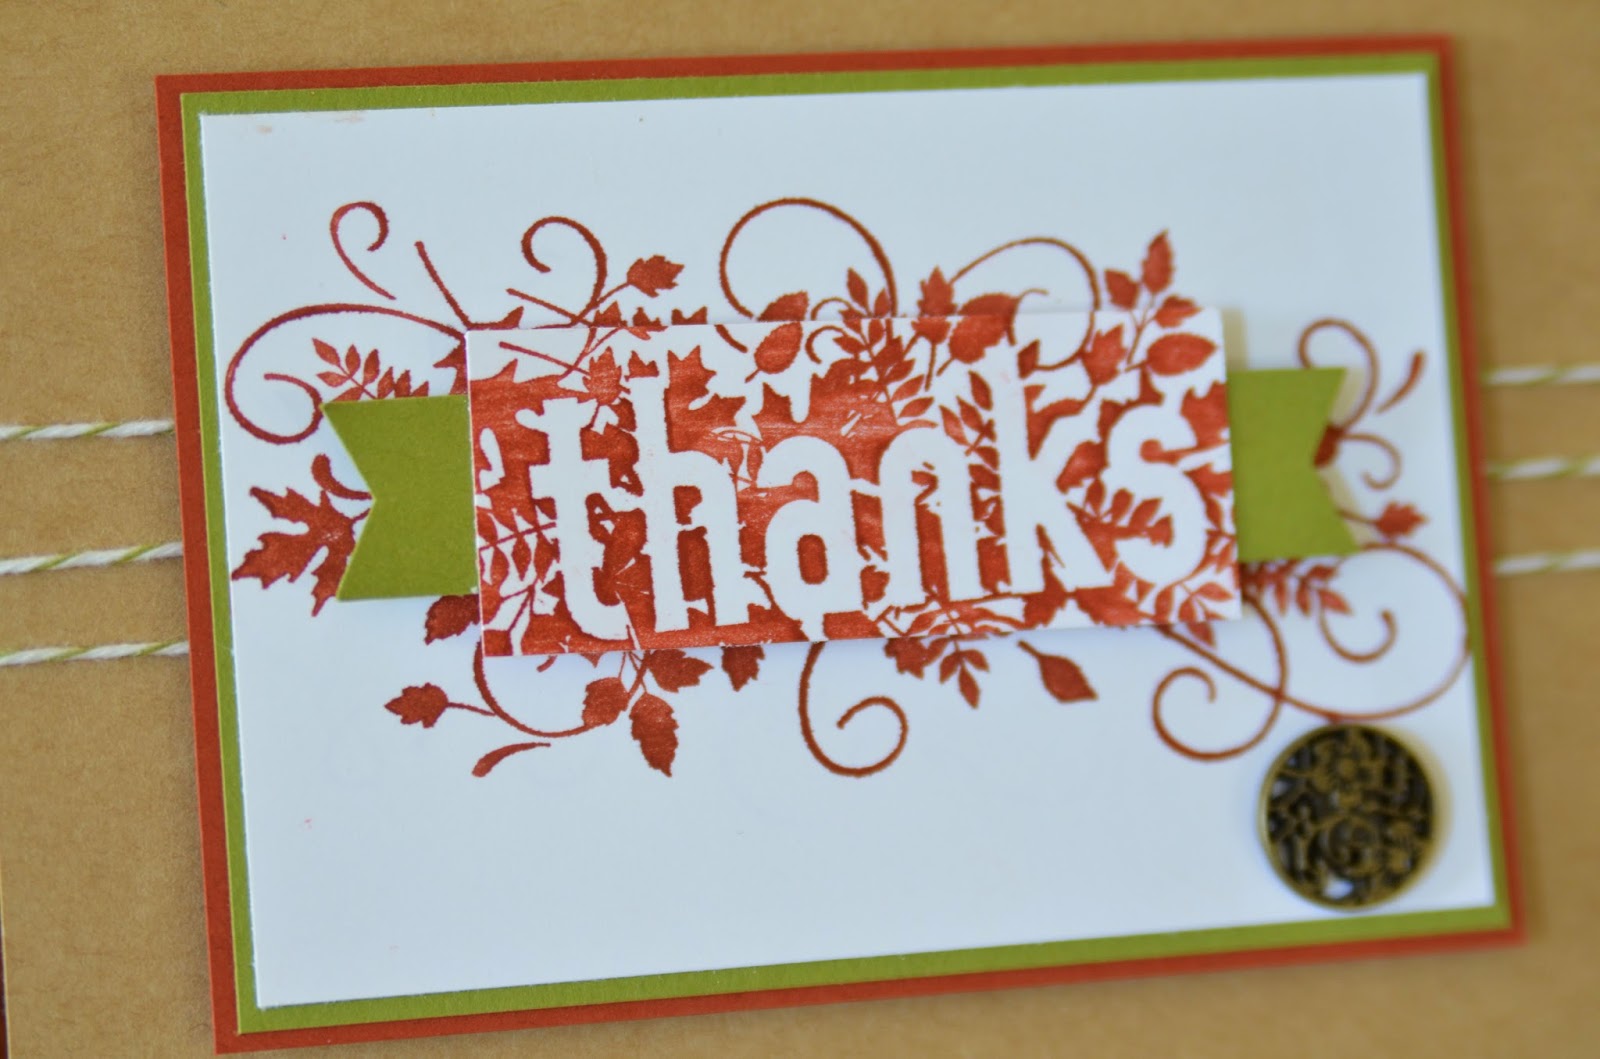
Creative Challenge Club and this week was a color challenge with a bonus to make it holiday related. I chose Thanksgiving for my Holiday to help kick out the cards I need to send to grandparents and long-distance close friends who we don't see very often.
It's a nice way to let someone know you are grateful for them and thinking about them even though you can't always see one another!

Here is what I came up with:
Isn't it just the sweetest!?!
I just love those mini envelopes with the Old Olive hearts! 
Kaitlyn is on the Artisan Design Team for Stampin' Up! and comes with with the most amazing paper crafting projects using Stampin' Up! products. 
As explained on her blog the envelopes are made by cutting DSP to 1-78" square and then using the simply scored board fitted with the diagonal plate, score at 1", turn, score at 3/4", turn, 1", turn, and once again score at 3/4". Simple, huh?
I added some hugs and kisses peaking out of one of the envelopes. 
Do you do OXOX or XOXO? 
My husband thinks I'm weird for doing OXOX. :)
Ever wish embossing powder came in EVERY SINGLE COLOR of Stampin' Up!'s colors?
You can fake it by inking up your stamp in Versa Mark (don't stamp yet!), then inking up in your color of choice and stamping on your paper. Add clear or iridescent ice embossing powder and then heat set.
Now you have a perfectly embossed image in any color you want!
I also picked that tip up from the blog listed above!
And I know you know by now that I like to add a little love to the inside of my cards.
And it almost always involves embossing.
I embossed the & sign using the same technique as explained above. 
Stamped on Marina Mist card stock I got a totally different look than I got on Whisper White card stock.

If you make something using this week's challenge, don't forget to link up by Sunday for a chance to win $10 in Stampin' Up! product. :)

Here's What I used:
Marina Mist CS
Old Olive CS
Soft Suede CS
"Vintage" DSP
PL Remember This Photopolymer Stamp Set
Tags 4 You Clear Mount (with coordinating punch)
Something to Say Clear Mount Stamp Set (for the heart)
Linen Thread
Embossing Folder (Vintage, I believe)
Iridecent Ice embossing powder

Happy Stamping!


 I lOVE sharing what I make with you! If you would like to use any of my pictures on your own blog, please directly link back to me and give Christina Thurlow credit!
Thanks!!!


Monday, September 8, 2014

A Note Of Thanks

Our oldest son turned 7 at the end of August!
He had a great birthday and received so many legos and even a little spending money, in which he bought more legos! ha!

As I was doing some final organizing of my craft room (my scrap drawers are finished and in place!) I came across a stack of Crumb Cake card stock in sizes too large for my scrap drawers for too small for my full size card stock storage unit.
At first I was unsure what to do with them and then an idea hit me to make some simple 3.5" X 5" Thank You note cards for our son to write his own Thank You Notes.


I stamped the "A Note Of Thanks" stamp in Pacific Point at the top of the card and our little man's initials on the bottom right corner, also in Pacific Point. 
(He likes bright blue so I knew this color would make him happy!)
He already filled out his first Thank You Note to Auntie Syrup and Uncle Pancake (yup, there is a story behind the names but for some other time! haha)
I love seeing my children's sweet handwriting on paper!

Happy Stamping!

 I lOVE sharing what I make with you! If you would like to use any of my pictures on your own blog, please directly link back to me and give Christina Thurlow credit!
Thanks!!!

Saturday, September 6, 2014

Happy Thanksgiving for CCC11

We've been off school this week on vacation and having a wonderful time taking day trips to the Blue Bell Ice Cream Factory, an Exotic Zoo in Johnson City, Texas, eating out, doing a little yard clean-up and best of all just relaxing together as a family!

The Creative Challenge Club this week is a color challenge and wow did it leave me stumped!
For several days I had mixed emotions about what I came up with but I think it's growing on me the longer it sits on my desk. ha!

I'll jump right in and share what I came up with:
 (Sorry for the slightly blurry picture and shadow!)

I started off with a card base in Crushed Curry and layered on some DSP featuring Island Indigo and Whisper White. I embossed the "vintage" tree in white on water color paper and then did a water color wash of Island Indigo (bottom), Crushed Curry (middle), and Pumpkin (top). Using my sewing machine I did a little machine stitching three times around the edge of the water color paper, scuffed the edge with my finger nail to roughen it up a bit and curled the top right edge over on itself. The sentiment is cropped with the banner framelits and clipped on with a mini paper clip with a knot of Island Indigo ribbon tied to it. 

Here's the Banner for this week's challenge:
If you create a card using the color challenge don't forget to link up for a chance to win free Stampin' Up! product. See their website for details!

Happing Stamping!

 I lOVE sharing what I make with you! If you would like to use any of my pictures on your own blog, please directly link back to me and give Christina Thurlow credit!
Thanks!!!